In this tutorial, you learn to add a logo to the genesis child theme or framework.
I think you already know how important a logo for a brand is. It is essential for all blogs and businesses, small or big does not matter.
Today every big brand can be recognized by their logo and by the quality of their product or service. Similarly, if you are going to start any new internet marketing firm, web design agency or just anything “online”, then first you will have to build up brand presence. Moreover, your first step is choosing a perfect brand logo.
Now choosing a logo for your business is a different task and adding it to a template is different.
In this post, I am going to consider that you are using the genesis framework to power up your business. And assuming that I am going to present you with some code snippets, which will help you to complete your development.
I think it is time to get back to the development process.
Add Logo To Genesis Child Theme Or Framework
However, the problem is it is not a perfect size for a logo, but is good for a header image, if you want to create a theme design like eleven twenty. Modern designs are usually transparent and can easily come under 300 pixels in width and 100 pixels by height.
Now I am not saying that it is the maximum size you can use. Actually, you have full control over the size. You have to just define the numerical values in the code and it will work as per your need. You can even go a step further by adding hard or soft crop.
Now before we add logo genesis, you will have to check your theme’s function.php file for the similar snippet. The reason for checking this code is to prevent your theme from breaking. If we use two similar functions then it will create a problem in PHP execution (in simple form).
add_theme_support( 'genesis-custom-header', array( 'width' => 960, 'height' => 100 ) );
If the code does not exist then please follow the steps I have listed below. Just copy the above snippet and paste it into your theme’s function file.
Inorder to do so, you will have to move to WordPress dashboard >> appearance >> editor. On this page try to locate functions.php. Now click on it and it will open in the editor. Now paste the code and click on update file button.

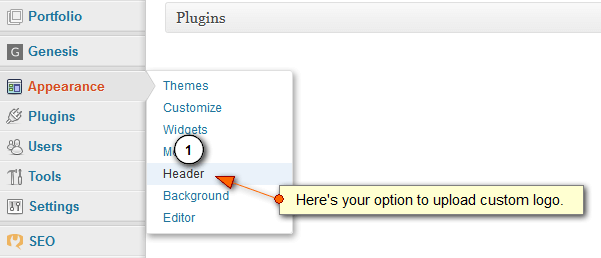
Now it’s time to check whether out snippet worked or not. Move your cursor to WordPress left navigation and under appearance check for header option. You can see the image I have attached above this paragraph.
So now, your theme support this functionality. But what if you want to upload the header image of size bigger or smaller than the specified size. Then you can add the code snippet provided below in your theme’s function.php file. For example, my template had a crop limit of 300 widths and 60 height. But I want to change it to 260 x 55, so then I will do this
//* Adding custom logo
add_theme_support( 'custom-header', array(
	'width'           =>260,
	'height'          => 55,
	'header-selector' => '.site-title a',
	'header-text'     => false
) );
You can modify the image size limit as per your choice. Remember that choosing the smaller size than the specified limit won’t create any problem. But if you choose to have a bigger size then you might need to edit some CSS area.
In such case, you will need firebug firefox addon and will have to inspect the header area to change it height.
Explanation
In the above snippet, we have used add_theme_support which is WordPress default function. This PHP function allows us to add custom supports to themes. Now using it, we created our custom-header and added an array to the PHP query. This query consists of dimensions of the image and the container name.
You can see that I have defined the width with value 260. Then I have added the height with value 55. Now you can see defined header-text to false. This means that when you will add a logo to genesis child theme, it will automatically disable the site text.
I wish you would have liked this tutorial. If you have any query then please discuss it in the comment section.

Worked for me! Thanks.