If you’re a blogger or an ecommerce store owner, building an email list is among your top priorities. And chances are, you’re either using popups already or have considered them. Because despite some skepticism, modals are still the leading tool for generating subscriptions. The trick is to set them right – so that your website visitors get to see the call-to-action, yet it doesn’t ruin their experience.
Here is where GetSiteControl comes in handy.
The concept isn’t new – it’s a no-code tool helping you build all types of popups and forms: email opt-ins, floating bars, contact boxes, survey forms, and even add a live chat widget to your website. What’s unique about GetSiteControl, however, is its precise targeting settings.
The team behind GetSiteControl believes that randomly-displayed popups may indeed seem annoying and harm your visitors’ experience on a website while not really bringing many conversions. The solution? Create more personalized messages and display them at the right moment.
So, let’s take a closer look at what GetSiteControl offers, and how you can benefit from its features.

Installation
For WordPress users, there is a dedicated plugin available in the directory, so you don’t need to manually make any changes to your website code. However, since GetSiteControl is a cloud solution, you will still need to create an account, and the plugin will merely connect it to your website.
How to create a subscription form in less than 5 minutes
Once you’ve signed up, you get to see a dashboard with an overview of all the widgets active on your website and brief stats on their performance. Next, you decide what you want to create: an email opt-in form, a survey, a contact form, a CTA popup, or a live chat.
The form builder is very intuitive. It’s divided into 6 tabs, and you set up widget appearance using the first two: Appearance and Content. There are 9 webpage positions for each popup to choose from – depending on how attention-grabbing you want it to be. Those include modals, floating bars, slide-ins, and side tabs.
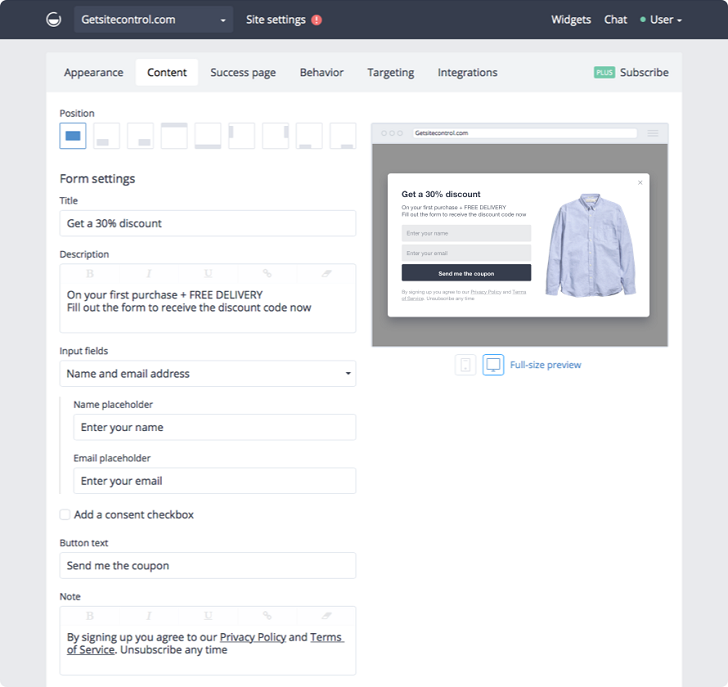
To customize a widget, upload your own images (or use the gallery), choose the colors (or apply your website color theme automatically), adjust font, animation, and a mobile view.
In the success page tab, you decide what happens when a visitor fills out the form. Your options are – close the widget, show a “Thank you” message, or redirect them to another URL.
Technically, after this, you can simply save the widget and activate it – the form will instantly go live on your website and start collecting subscribers.
How to optimize conversions using on-page behavior triggers
Now, if you’re geeky about conversion optimization, you’ll be interested in checking out the Behavior and the Targeting tabs. This is where you define what type of audience will see the form and when.
The former helps you set triggers based on the user on-page actions. For instance, instead of showing a popup right away, you can choose to display it after someone has scrolled through 30% of your content or spent 20 seconds on a webpage. This way, only those who have already shown some interest to what you offer – and typically they are more inclined to subscribe – will see your call-to-action.
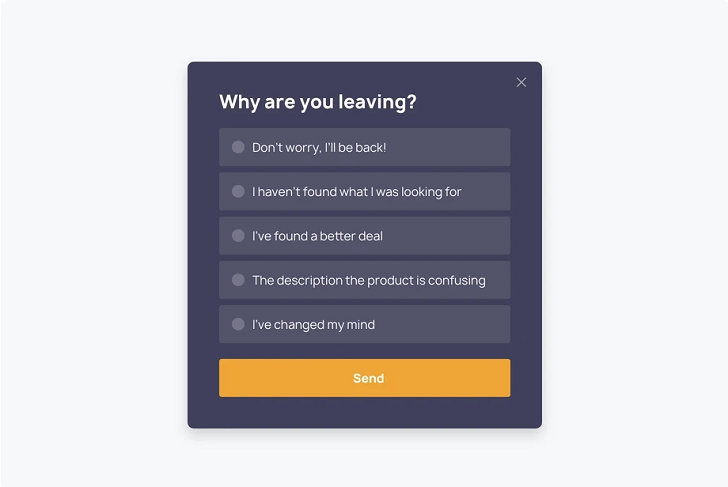
Alternatively, you may want to use the exit-intent trigger and show a popup when someone is about to leave a webpage. For this scenario, you can display an exclusive offer in an attempt to convert some of the abandoning visitors or create a website exit survey to ask why exactly they are leaving.
How to create personalized popups with audience targeting
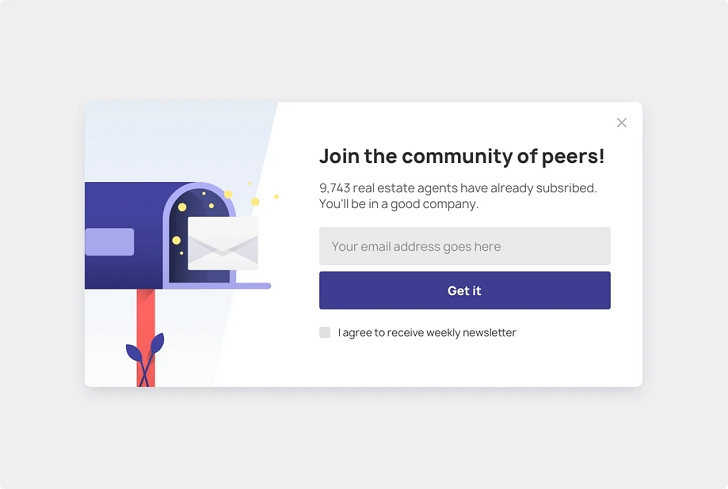
The Targeting tab allows you to target specific audience segments based on their language, location, device, browser, UTM, referral source, or custom API parameters. You can also target new and returning visitors differently and slightly alter the copy or the call-to-action based on the page you display it.
The use cases here are numerous. For example, if your content is diverse on topics, people are more likely to subscribe to a newsletter that will be relevant to what they are currently reading. Hence, higher conversion rates from personalized email opt-ins. For such cases, content upgrades serve great as lead magnets. And if you need more tactics, here is a roundup of ideas on how to build an email list prepared by GetSiteControl team.
GetSiteControl pricing
GetSiteControl is surprisingly affordable – especially if compared to similar solutions like Sumo or Optinmonster – and its pricing plans are feature-independent.
In other words, the cost of subscription will only increase when your website grows significantly – and so does the number of widget views. Here is how the subscription breakdown looks like:
- $19/mo for up to 10K widget views;
- $29/mo if you expect 100K views;
- $49/mo for the unlimited subscription.
That is, of course, after a 7-day free trial.
Wrapping up
GetSiteControl is a versatile solution that brings a lot of value and will save you some time and money because you get all these essential tools available in a single dashboard. Although their email subscription forms are probably the first thing you might want to try.
Check it out and let us know what you think in the comments below!
Leave a Reply