Recently I got into a big trouble. Every time I tried to open a new tab in Google Chrome, to open a new website I was getting this weird DNS_PROBE_FINISHED_NXDOMAIN error.
Even though my internet connection was working fine; I knew this because I was able to browse websites through Mozilla Firefox browser, chrome was just not responding to my requests.
I tried to implement various different methods from various forums and technology blogs, but none seem to work for me. I even tried reinstalling the chrome through the online installer, but even that didn’t seem to work for me. I struggled the whole night without any success. Then I thought that this might be the problem with my DNS as the error says. And soon I found out a method (to be exact 3 methods) which actually works and can fix dns probe finished nxdomain error within few minutes.
For those who don’t know what this error is and what it does, it is a type of DNS error which you will see while using Google Chrome. This error occurs when your system fails to successfully perform DNS lookup.
It also means that there is a problem from your end (system) and it’s not because of the server failure.
DNS which stands for Domain Name System is a special type of computer server which translates the domain name into their respective IP address. Without DNS, you just can’t browse any website in this whole world unless you know the exact server IP address and the port number. So basically you can say that it’s a lifeline which connects the users to the client servers.
Contents
Fix DNS_PROBE_FINISHED_NXDOMAIN error in Google Chrome

There can be various reasons behind DNS not working. One the most common reason is the corrupt DNS entries which usually happens when you install any malware or virus. It can also arise due to certain VPN software or misconfiguration of firewalls.
But you don’t need to worry as I have 100% working methods to resolve the DNS_PROBE_FINISHED_NXDOMAIN error in chrome. You just need to pick any one solution and then follow the instructions step by step.
Solution 1: Using the public DNS server
DNS is a very special type of server’s which helps to translate the domain name to its appropriate IP address. They can also be considered a mean by which the internet becomes more user-friendly because without it almost no normal person will be able to access any website on the internet. DNS servers are mainly used by internet service provider, but sometimes they don’t work and as a result, you have to face the problems.
There are dozens of world-renowned companies which offers free access to their premium, industry grade DNS servers. One of the most popular is Google Public DNS and OpenDNS. Now please follow the steps listed below.
Step 1. Open windows control panel.
Step 2. Search for Network and sharing center in the control panel.
Step 3. Now click on the “change adapter settings” option from the left-hand side menu.
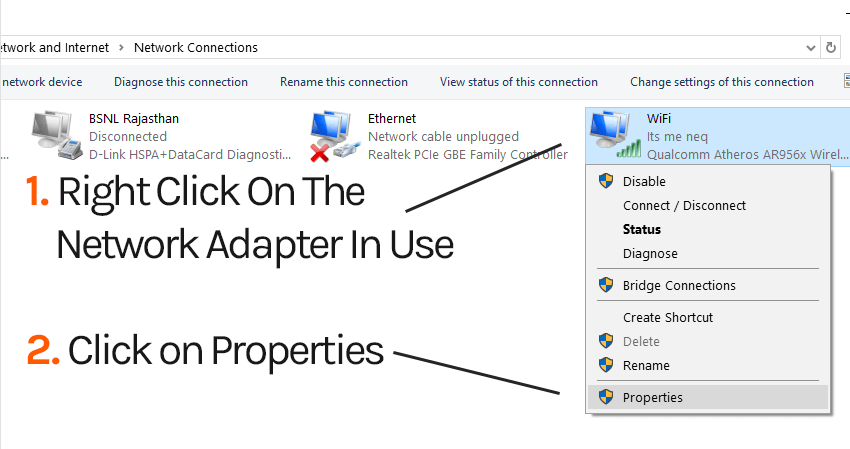
Step 4. Right click on the Network Adapter which is currently in use. As you can see in the image attached below, I am using the WIFI.

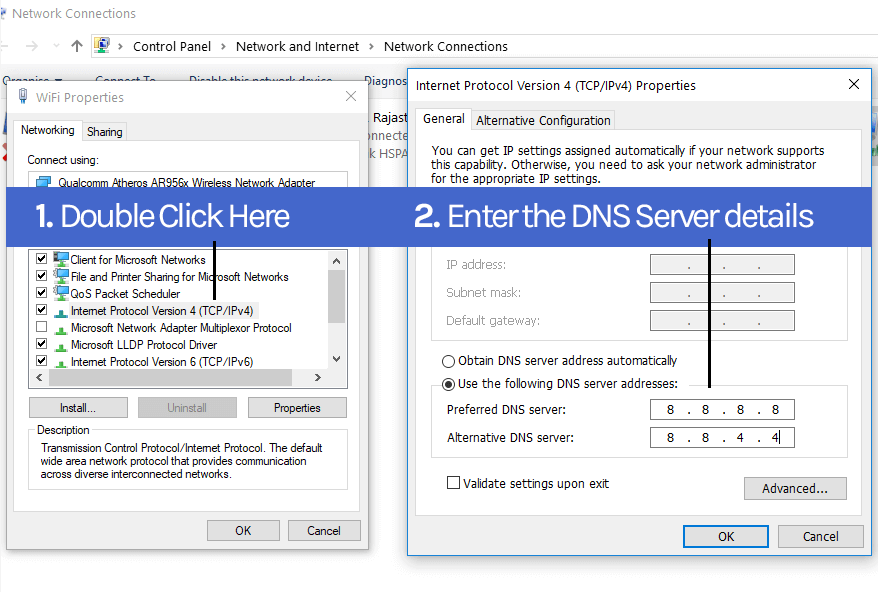
Step 5. Click on properties and then from the provided options double click on Internet Protocol Version 4(TCP/IPv4).
Step 6. Select “Use the following DNS server address:”. Now add the following code manually in the provided fields.

8.8.8.8 and 8.8.4.4
Once you are done entering the dns server address, click on “OK” button. Now reboot your system and try to access any website through Google Chrome again. In case you are able to access the websites then please share this tutorial with your friends. If you are still facing the same problem then please follow the next method.
Solution 2: Flush your DNS and renew it using CMD

This method worked for me but I can’t guarantee that it will work for you. It worked for me because I was trying to access a domain which recently changed its nameserver.
Every domain has TTL (time to live) field which determines for how long the DNS related information will be cached. It usually varies from 1 minute to even a day.
Because the domain I wanted to reach was already cached by my DNS server, I had to flush and renew it in order to gather the new nameserver information. And finally, I was able to browse it.
Ok, so it’s enough information, let us talk about the solution. Please kindly follow all the steps provided below one by one.
1. User windows search feature to find the command prompt or CMD.
2. Right click on it and then select “Run as administrator” option.
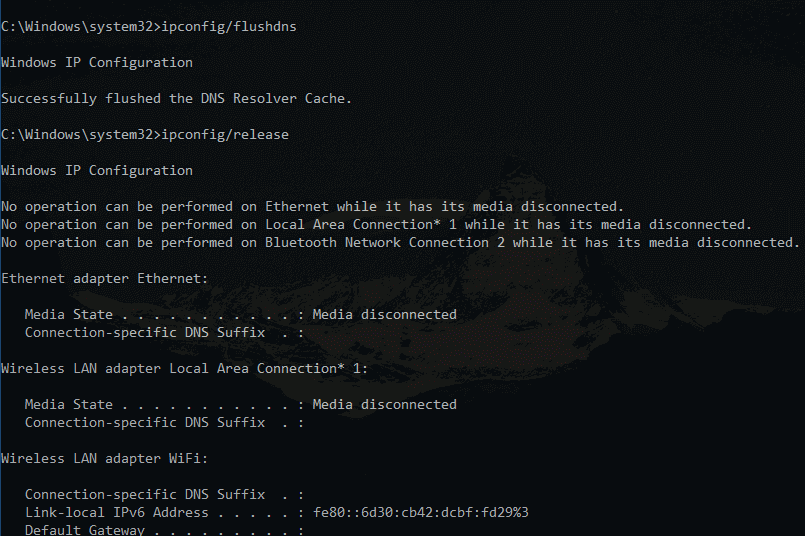
3. Now enter the code one by one in the command prompt.
- ipconfig/flushdns
- ipconfig/release
- ipconfig/renew
Now once again, once all the steps are completed, reboot your system and check if you are able to access the internet or not.
Solution 3: Reset Google Chrome
According to errorcodeguru, the last solution is to reset your Chrome browser. This will work for almost everyone because by implementing this method you are deleting all the caches and other domain related information stored in your web browser.
Please be advised, if you reset your browser, all your personal preferences will be lost, though that be can be restored by logging into your Google account (only if you have enabled the synchronization).
Below to the steps you need to follow if you wish to reset Chrome.
- Click on the three-dot button on the top right-hand side of Chrome browser.
- Now click on “show advanced settings”.
- Scroll to the bottom of the page.
- Click on “reset settings”. From the popup notification click on reset button.
Wait for few seconds and soon your browser will restart. I hope all the methods which I have discussed here will help you to resolve the dns_probe_finished_nxdomain error in chrome. In case if you still face any problem, then please don’t hesitate to question me in the comment section.

I was excited to find this site. I wanted to thank you for your time for this wonderful read!! I definitely savored every little bit of it and I have you book marked to check out new things in your web site.
Thank your site! information your share is useful to me!
Hi There, I was searching for a solution for this and tried all of your sugestions above. Thanks for very useful information. I found that resetting Winsock resolved the issue for me. Makes sense. Winsock manages input and output requests for Internet applications on Windows. Therefore, resetting it helped me to get rid of DNS_PROBE_FINISHED_NXDOMAIN. I also found the solution in article was also really helpful with possible solutions