If you are running an eCommerce website using the WordPress CMS, you have at least employed a couple of advertising and marketing campaigns in order to draw visibility to your website.
These days when you open up an eCommerce site for your business, a website is not enough. The majority of the online users are hooked up to social media sites, especially with Facebook. Online users use Facebook as a means to look for something, whether this be a place to visit, to eat, to get service from or even buy items.
Facebook has a very confusing advertising system, which is shared amongst those who have advertising campaigns on the social media site. Every feature that you find on Facebook makes it one of the greatest advertising platform, but you can’t ignore its complexity. And one of these complex aspects of FB advertising is the Facebook Pixels.
What are Facebook Pixels?
Facebook is not the only social media platform that’s got this feature. You can see them in almost every advertising platforms. They are utilized in dropping a cookie which will be used in tracking the visitors of your website so that you get to advertise to them afterward. This process is referred to as retargeting. Once you have advertised to the past visitors of your website, the pixels can then be used in tracking the visitor’s behavior when they visit your website again. This will aid you measuring the effective rate of the ads you have put up.
With Facebook, they are using a customized audience pixel in retargeting visitors of the website. There is also the conversion pixels that is used in tracking up website conversions like sales. While every advertising account comes with a single custom audience pixel, users can freely create as many conversion pixels as they can, like one for each web page that you want the conversions to be tracked.
These pixels may look very confusing, but once you get the hang of it, you will realize how effective advertising on Facebook is with it. You will know exactly the audience that you are advertising to and even gain a better understanding of how the ads that you have used are performing. You can also make a more effective messaging, which leads to a better return on the advertising money that you’ve spent.
Back in 2015, Facebook went on another level in simplifying the process by revealing the Facebook Pixel. All of them is replaced by one pixel. This new pixel is the only pixel you will ever need. It comes with tracking, optimization and retargeting built in one feature.
Installing Facebook Pixel on WordPress Website
From the start of this article, I am already assuming that my readers are using WordPress as their CMS platform for their website. If you are using a different platform, find a tutorial that gives you a step-by-step process in how to install Facebook Pixels.
Step 1: Register Business
In this step, you will need to generate Facebook Pixel from the social media network itself. This means that you need to have an ad account on Facebook, not just a page or a regular account. But if you don’t any account then you can do so by going to this link and by clicking on “Create Account” button.
Once you have created the ad account, go to the business manager or type the URL https://business.facebook.com/settings/. Once inside the settings page, you will need to click on the on the “Pixels” link on the sidebar.
Now you will be offered with a button “Create a Facebook Pixel”.
Now enter the name which best suits you and then click on “Next” button. You will get a new message saying that your settings are saved and in the background, you will see that you have received a new pixel ID.
Step 2: Get The Code
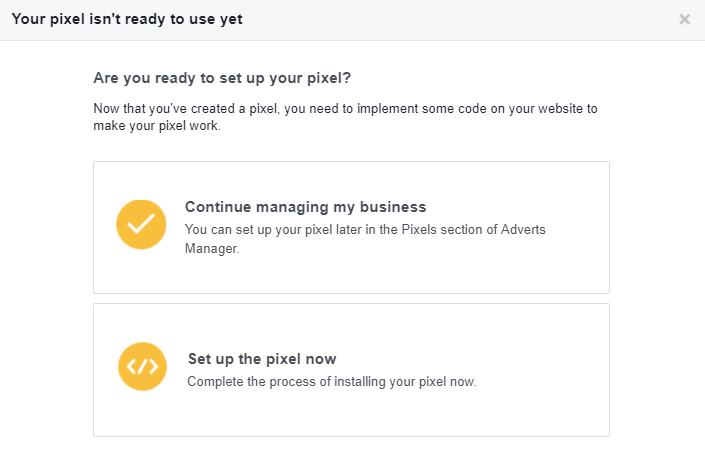
In the pop-up box, you will get two options. The 1st option lets you manage your business while the 2nd one will allow you to complete the pixel setup. For now, click on the second section option.
Now again you will be offered with two different installation options.
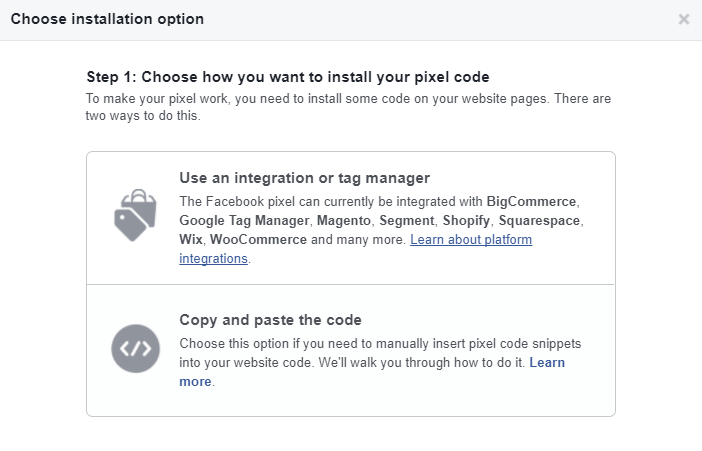
The 1st option gives you integration support for some of the most popular e-commerce platforms like WooCommerce, Shopify, BigCommerce, Wix etc. The 2nd option lets you manually insert the code into your website.
I won’t be explaining the 1st option because if you select it then you will get a detailed video tutorial explaining how to connect facebook pixels with Woo Commerce.
So as for this tutorial, you will need to click on the 2nd option. After that, you will see three tabs, click on the 1st tab and then copy the code.
You will be instructed through the process that you need to copy and paste the code in between the <head> tags in the website code. The pixel will function by tracking visits on each page of the website you manage.
Step 3: Adding The Code To Your Website
In this step, you need to install the Insert Header and Footer plugin in your WordPress website. To do this, go to “Plugins” in your WordPress Dashboard, then click on “Add New”, then input the words “Header and Footer” in the search box. Once you find the plugin, click on the “Install” button.
After installing the plugin, paste the code of the Facebook Pixel in the Header and Footer plugin.
How to do so?
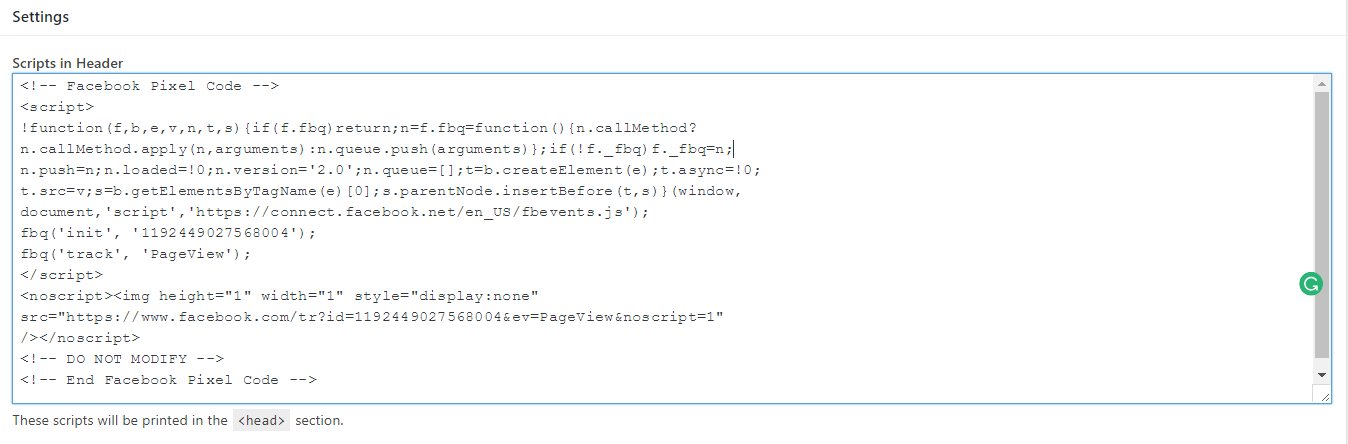
Go back to the admin of WordPress. Now navigate to “Settings” then look for the label “Insert Headers and Footers”. Once there, you will two big white boxes. You need to place your snippet in the first box with the title “Scripts in Header”.
So copy your code from Facebook and paste it on this area. After making the changes, click on the “Save” button which you can find at the bottom of the page.
In case you are using any premium wordpress theme or framework like Genesis then most probably your theme already have an option which let you add custom scripts to header and footer area. If that’s the case then you don’t need to install the plugin I have suggested above.
If you are using Genesis framework, then you will need to visit Genesis – Theme Settings and then you need to scroll down the page. You will see a box with the text “Header Scripts”. Just paste your code over here and then on “Save Changes” button.
Step 4: Install Event Code
Currently, Facebook provides support for 9 different types of events and they are Search, View Content, Add to Cart, Add Payment Info, Checkout, Wishlist, Complete Registration, Leads and Purchase.
All of these events can be monitored using the Facebook analytics once the codes are properly installed on your website. You must know that each of these events needs a specific code to be installed on your website.
For example, let’s say that you want to track the number of customers adding their payment info. For this, you will need to install the following code:
<script>
fbq('track', 'AddPaymentInfo');
</script>
Similarly, if you want to know how many users are performing a search on your website then you will need to install the following code:
<script>
fbq('track', 'Search');
</script>Note: The codes which I am sharing above with you are very Basic. Currently, Facebook offers three different types of codes, 1st basic, 2nd recommended and 3rd advanced.
Let’s say that you want to see what are the products your customers or your website visitors are purchasing on your site.
If you install the basic code then you will get information of all of the purchases on your site.
If you install the recommended code then you can drill down to the specific currency and value per product.
And if you install the advanced code then you track specific product, product ids, currency, and values. Here’s one example:
<script>
fbq('track', 'Purchase', {
content_ids: ['cs_1901', 'cs_1807', 'cs_1706'],
content_type: 'product',
value: 126.85,
currency: 'USD'
});
</script>
Obviously, all these values can be further customized as per your requirements.
Once you have decided the best option for yourself, you need to again navigate to Header and Footer plugin’s settings page and have to paste your code.
Step 5: How to Use Facebook Pixel
As you can see by yourself, Pixels is easy for new marketers and offers dozens of possible tracking customizations for established online businesses. So it is best recommended that you learn what are the features that you are not aware of before. You can learn more about Pixels from the official help section.
Website Custom Audiences
This is how Facebook aids you in retargeting website visitors. Having Facebook Pixel installed in your website will aid in tracking the movements of every visitors of your website that have simultaneously logged in to Facebook. It records every visit that each of your website’s page is getting and which pages they do not visit and the time that they visited. By using the data, you get to advertise effectively on a narrowed target group.
To make this clear, Facebook does not allow you to choose a particular website visitor and even directly advertise to them. What you can do instead is advertise to groups of people that are based on similar behavior.
You can define the Website Custom Audiences according to the pages they visit or not and when they have visited. You can also pick on a particular time frame between one and 180 days.
The audiences are formed independently based on the ads they have an interest on. Once the audience is formed, you get to choose when to make an advertisement for them and which ads you prefer to use. You can even percolate them if you find some use for it in the near future.
Leave a Reply