If you want to develop wordpress themes or plugins then you will need to install WordPress locally on your system. One of the best ways is using XAMPP which is a freely available web server. It will help you create MySQL database which is essential to run any WordPress setup.
The plus point of using XAMPP is that you don’t need to install it. I mean you have to just download the copy from the official website and have to unzip in your windows directory. One another benefit of using it is that you can easily find the add-ons which will help you easily setup WordPress, Drupal or Joomla locally.
Contents
Install WordPress On XAMPP
Before we move ahead we have to first setup our local server. For this, you will have to download XAMPP from its website. Here we won’t use any addon for installing WordPress. You have to just download the copy and have to follow the steps.
Once you download the complete setup file of XAMPP, just copy it and move to your Windows drive. Basically, its C drive but may differ from PC to PCs. After navigating to the root drive ( C drive ) just unzip the XAMPP folder. That’s all, the installation is 100% complete.
Setting Up The Database – Step 1
We all know that WordPress is a content management system and it requires MySQL to store all its information related to posts, pages, comments, port formats, user identity and other custom settings.
So if you want to run WordPress locally you will have to set up the database on your system and so visit http://localhost/xampp/. Now from the left-hand side navigation find the phpMyAdmin and click it. This will take you to another page.

Over here you have to type the desired name of your database and the click on button Create.
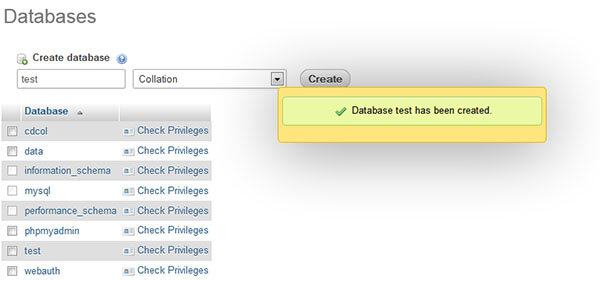
That’s all, now you have successfully created the database. Similarly, you can create another one if you wish to test multiple sites.
WordPress Installation – Step 2
Now its time to install the WordPress. But for this, you will have to download the file. You can also use the addon supplied especially by XAMPP. But then I don’t feel comfortable with this addon as its setup file size if more than 23 MB and that of official WordPress is 5 MB. So let us move with the manual installation.

Download the WordPress from the official website and then you have to just unzip the folder. The folder will be named along with the version. But inside it, you will find the real folder which we need.
Now just copy the folder and move to your computer drive where you have installed the XAMPP.
WordPress Setup – Step 3

Now its time to complete the setup of wordpress. For this you will have to paste the wordpress folder into your computer drive >> xampp >> htdocs. Once done you should visit to computer drive >> xampp >> xampp-control. Click it and it will open a new screen with multiple options.
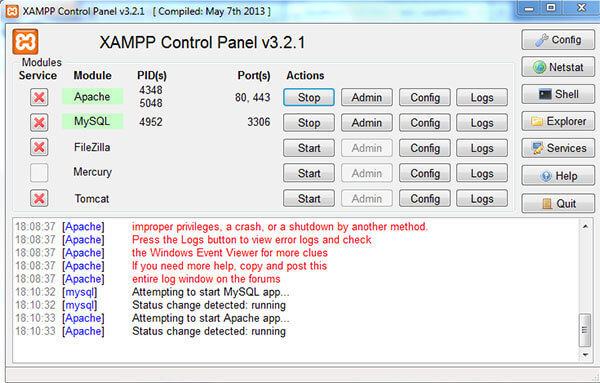
Here you will have to start Apache and MySQL. Once done you should visit to drive >> xampp >> htdocs >> WordPress. Here you will find a file named as wp-config-sample. Now you can use either notepad or notepad ++ for editing this file.
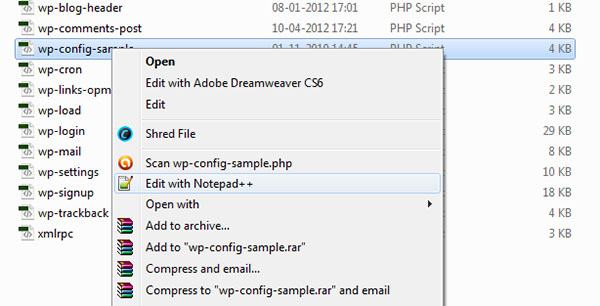
Inside this file, you will see lots of functions along with complete commenting. You have to just edit which have been highlighted in the image provided below.
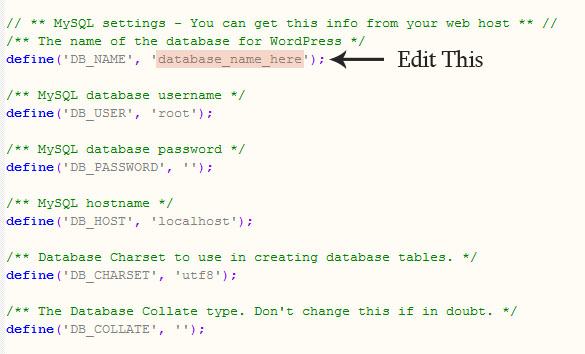
Here you will have to change the ” database_name_here ” with the name you have chosen in step -1. In my case it’s test. So I will just copy it and paste it in the place of database_name_here.
In the MySQL username by default its ‘username_here’, replace the username_here to root.
And for the password, the field should be empty. I mean your configuration file will have ‘password_here’, so delete the password_here.
Once done, simply save the file as wp-config.php. And then visit http://localhost/wordpress.
Over here you will be asked to add your username and password. Add them and then log in to your dashboard. Now you can edit your themes, plugins and test your website’s design offline.
If you want to develop and design themes and plugins then I will suggest enabling wp-debug option from the wp-config.php page. By enabling the debugging option, you will check the compatibility of your add-ons and templates with latest WordPress updates.

yeah, i think this articles gived completely, because i wanna learn editing css for my site. And i thankful your tutorial working well.
Thank you Vivek Kumar for sharing this great information with the audience to install wordpress using localhost XAMPP. While researching i have found several post regarding wordpress installation using localhost and i have found your post really in depth for me. You have defined it in 3 steps.
Thank You Vivek for sharing this awesome article, for a long time I was using shared hosting and this article helped me when there\’s any problem while installing WordPress, so far, I have now moved to managed WordPress hosting platform and using their console to install everything, but still I am hosting some blogs on shared hosting get help from this post written by you.