
Recently I was searching for the best alternative to DigitalOcean cloud hosting, and then I stumbled upon Vultr. You can consider it as the most competitive, budget-friendly VPS infrastructure provider.
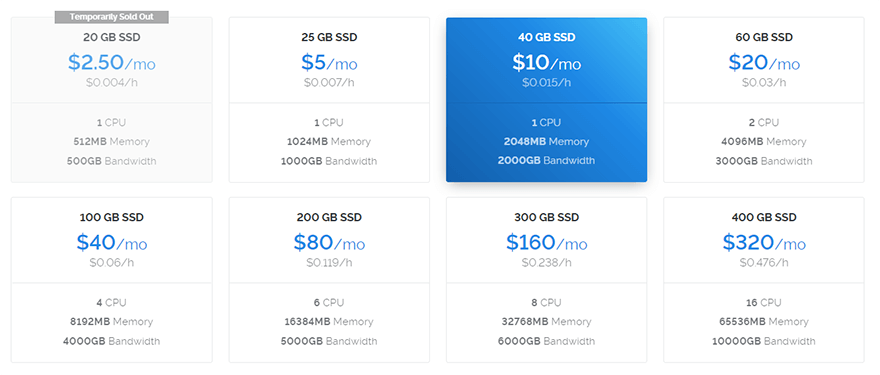
Its plans start from $2.5 per month (yes you read it correctly) and go as high as $320 per month. Obviously, the biggest $320 per month plan is for big e-commerce or enterprise. If you are just starting a new website, the starter plan is just perfect for you. So considering the price, specifications and most importantly server speed it seems that Vultr is quite ahead of DigitalOcean.
You ask why?
Well according to the VPS benchmark the response time of Vultr’s $5 plan is 106.2ms while DigitalOcean’s $10 plan is 116.9ms. That’s not all. DigitalOcean’s $10 plan gives you 1GB RAM, 1CPU core, and 2TB bandwidth while Vultr charges just $5 for almost configuration expect the bandwidth.
So now you are free to guess who’s the winner here.
How to Install WordPress on Vultr Using Serverpilot
In this tutorial, I will show you how to use a free but not open-source service named serverpilot for easy, performance-optimized server configuration.
Although I really like cost-effective, cloud VPS provided by Vultr and I should also mention there great, minimal user interface, but their’s something which I don’t like about them. Even though they allow you to install wordpress and many different open-source applications with one click, but their default server configuration is not suitable for heavily trafficked wordpress powered websites.
That’s the reason why I am going to use serverpilot which installs Nginx instead of Apache. Nginx can easily handle a massive increase in traffic without overloading your server. You can read this Nginx vs. Apache performance benchmark. Now let’s get back to our main topic.
Step 1: Choose your server type
I assume that you already have an account at Vultr. Now once you have your verified and added money to your account, you will need to create a new VPS to host your wordpress site. To do that you need to click on the “Blue Plus” button.
I will suggest choosing virtual cloud to compute instances(VC2). Compute instance is cheaper than dedicated instance and for just $10, you will get the 2GB ram, 1 CPU, 40GB SSD storage and 2000GB bandwidth.
Step 2: Choose Your VPS Location
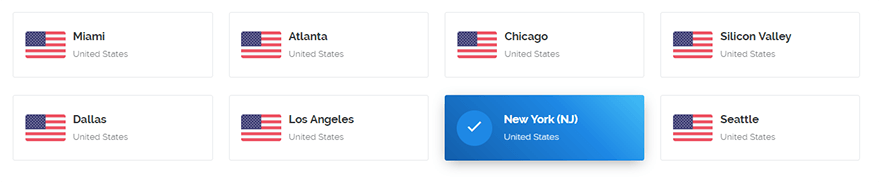
While choosing the server location, I will suggest choosing the one from where most of your website traffic arrive. Like in my case I choose New York as most of my readers to come from USA and UK.
Step 3: Choose OS
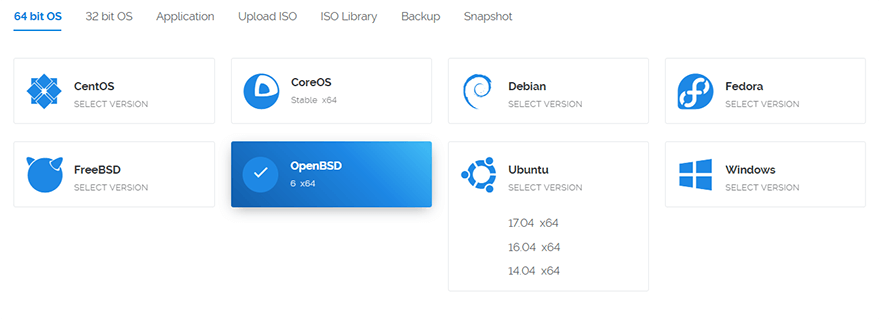
Now you will need to choose an operating system for your server. First, you will have to click on 64 bit OS, and then You need to click on Ubuntu button. Now from the drop down options select 16.04.
Remember that you must choose 16.04 because serverpilot is only compatible with this version of Ubuntu release.
Step 4: Enable IPv6 & Backups
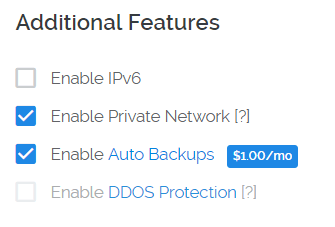
Now scroll down the screen and under “Additional Features” click on “Enable IPv6” option. Enabling this option will give your VPS an IPv6 address and will also make your website future proof.
If you want to give extra protection to your site and its data by choosing “Enable Auto Backups”. Just remember that Automatic Backup option will increase your overall monthly bill by 20% regardless of your plan.
You also have an option to enable DDOS protection, but the only problem is that this service is not available for all regions.
Step 5: Enter Your Domain Name
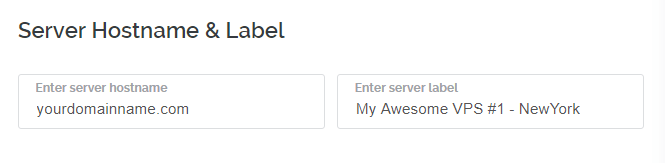
Then finally enter your hostname (your domain name) and server label (a professional and easy to remember the name for your VPS).
Step 6: Copy your server’s root password
I have created an another section for this level because readers usually miss it.
You will need your VPS root password in the next upcoming step, and so you will need to copy it and paste it temporarily somewhere on your desktop.
Now the question is where to find the password?
Well, it’s quite simple. All you need to do is to log in to your vultr account. As soon as you log in you will be taken to your server information page (if you have only one instance) or you will see all your instances under instance tab.
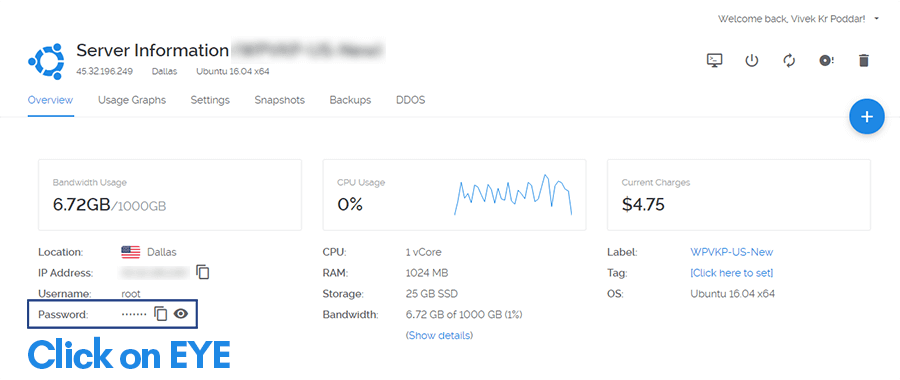
Now click on your server and then click on eye icon shown beside the password area. As soon as you click the eye icon you will see some text information, just copy it and paste it into your notepad and save it.
Step 7: Connect your Vultr VPS with Servepilot
Now once you completed all your task of setting up your server, let’s move to connecting your server with serverpilot. There are mainly two different ways of doing this. 1st is an automated method, and 2nd one requires some manual work. I usually prefer using the automated method, not because it’s simple but because it’s fast. So, follow these steps carefully.

At first, you will need to login to your serverpilot account and then click on “Connect To Server” button. Now it’s a good time to open your notepad file and copy the password you saved in your 6th step.
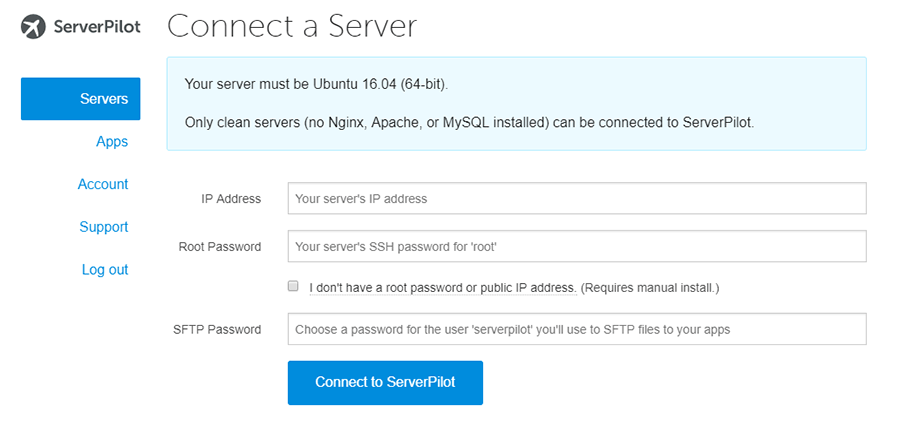
Now a new page will load, and you will need to enter few server details in the provided text fields. First, you need to input the IP address of your server ( you can either copy the IP address from the vultr control panel or can grab it from your email).
Enter your server’s root password. Root passwords are delivered to your email every time you deploy a new VPS on vultr. Don’t hesitate to enter your root password as it’s required only once to install serverpilot automatically on your VPS. You can later change the root password, or you can manually install serverpilot.
Finally, enter the FTP password you want to set. It’s always better to choose complex passwords.
Step 8: Create a new app
Now you have come to your last step. In this step, you will need to create an app by clicking on “Create App” button. After clicking the button, the page will load certain fields. You can see the screenshot below. Follow these steps carefully to install wordpress on vultr.
- Enter the name of your app in the first field.
- Now enter the name of your domain in the second field.
- Select the WordPress checkbox, and it will open its own set of fields.
- In the title field, enter the name of your website or blog.
- In the user field, you need to enter the username for your wp administration panel.
- Now in the password field, enter a complex password. Password size should help me more than eight letters ( alphanumeric ).
- In the next field enter your email address.
- Now from the Runtime radio buttons select the latest PHP version.
- From the drop-down menu choose the server in which you want to install this app.
- Finally, click on “Create App” button. Now wait for few seconds, and your wordpress installation is ready.
I hope this guide will help you successfully setup wordpress website on Vultr. I personally love using serverpilot because of it’s straightforward and easy to use interface. I mean everything on their control panel are quite self-explanatory, and thus it’s noob friendly.
Even after following this guide if you face any problem, then please don’t hesitate to connect with me in the comment section. I will be more than happy to help you.
What a perfect guide man. I really like the way you explained each and every single step. And I truly love your website design. May I know who is the developer of this theme or which template your are using.
As for vultr, I agree, it’s one of the best, for me personally, its the best cloud hosting service provider. Not only it offers more server resources compared to its competitors, it’s server are even quite fast.
Hi,
Thanks for your comment.