
No matter how good your house looks inside and outside, it won’t hold the ground for too long without a solid foundation. The same thing happens in SEO. Unless you lay a solid technical foundation, your site won’t rank the way you want. Neither a smart keyword choice nor a strong backlink profile will help.
The more roadblocks Google crawlers find on their way, the harder they’ll find it to index your site, the worse rankings you’ll have in organic search. Before thinking out complex strategies like local SEO, focus on the technical stuff. As a non-techie, you may be tempted to skip this step. But it’s not that difficult as you may think.
Learn how to handle technical SEO without being a tech guru.
Contents
Step 1. Keep your website structure simple.
The first and foremost aspect of technical SEO is a website structure. The better it is organized, the easier Google will crawl and index your content. If your site is a big mess of pages, some of them will remain unindexed. Here are the key points to take into account.
- Every page must be only a few clicks away from the homepage. If you have pages of vital importance, people should be able to access them from different places on your site.
- Create up to seven content categories unless you are an eCommerce giant like Amazon or eBay. The number of subcategories should be even (not 15 vs 2).
- Locate categories in the header menu and duplicate them in the footer. Today, there are many WordPress themes with image-based navigation. Although they look magnificent, you’d better stay traditional on such a serious issue as content indexation. That’s why text links are your best choices for the header and footer menus.
- Use internal linking to make navigation easier and spread link juice among pages.
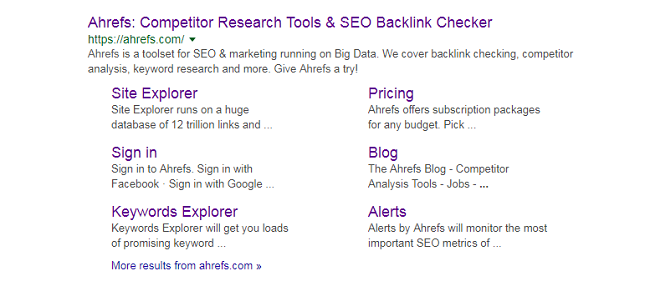
Sitelinks are the major signals that you have a well-organized website structure. If you type your company name into Google, you’ll see them on the homepage in two columns.
Sitelinks give an advantage regarding navigability and click-through rates. Occupying more space in SERP, they also push your competitors down.
Note that you can’t manipulate site links on your part. Google decides itself whether to award them to your site. And that decision is based on how well your content structure is organized.
Step 2. Set up 301 redirects for pages that don’t exist anymore.
When you move or delete a certain page, 301 redirections will send crawlers and visitors to a valid URL on your site instead of 404 page. To manage 301 redirects, install this totally free plugin. It will monitor changes to your post and page permalinks and create 301 redirects automatically.
Besides mismatching URLs, the plugin can redirect users based on the following conditions:
- login status (redirect users who have logged in or logged out);
- browser (redirect users of Firefox or, say, Internet Explorer);
- referrer (redirect visitors who entered the URL from another page).

According to John Mueller, a Google analyst of webmaster trends, you won’t lose any link juice from 301 redirects. In fact, they provide an SEO benefit. Backlinks from the redirected domain will transfer to the new one. That way, you will keep the power of your backlink profile and avoid a ranking drop.
Step 3. Opt for either www or non-www.
Whether you run a www or non-www site, you won’t benefit from it in any way. It’s just a matter of your personal taste, which Google officially confirmed. But if you keep both, it will hurt your SEO. Google thinks the following URLs lead to different pages:
- http://wpvkp.com/freebies
- http://wpvkp.com/freebies
And as those pages have the same content, the chances are Google Panda will penalize you. That’s definitely not the part of your SEO plan.
So, stay consistent in your choice. Enter your account into Google Webmaster Tools and choose how to display URLs in the Site Settings section. Next, set up a 301 redirect to send users and crawlers to the version you’ve chosen.
Step 4. Go “canonical” to avoid penalties for duplicate content.
Duplicate or very similar content is a surefire way to get a penalty from Panda. Make sure different pages on your site have different information.
However, there are cases when you can’t escape some partial content duplication. For example, WooCommerce stores allow customers to filter products by their size, color, style, and other attributes. As a result of filtering, the system generates URLs with similar content.
That’s when you need to add the attribute rel=canonical to the HTML link tag of the preferred page. Here’s how it looks:
Note that the canonical attribute is advantageous to SEO. Google counts links to pages with similar content as links to the single page with the canonical attribute. It will strengthen a link profile of that page and raise its position in SERP.
Step 5. Restrict access to your sensitive content for Google spiders.
Your site has sensitive areas where Google spiders should never get. To block their way, you need to specify URLs of those areas in robots.txt. This text file tells search engines which URLs they can’t index on your site. You should put it at the root of your domain, e.g., http://wpvkp.com/robots.txt. If you name this file in any other way or misspell it, Google won’t recognize it.
Your robots.txt file can contain one block of directives for all search engines or different blocks for different engines. There are two lines in each block, i.e. User-agent and Disallow.
- User-agent specifies the name of a search engine spider to hide your sensitive content from. Depending on the role, search engines have various spiders, e.g., Googlebot-Image, Googlebot-Mobile, Googlebot-News, Googlebot-Video, etc.
- Disallow indicates which parts of your site you want to block access to. The values you add there are case-sensitive, which means /photo/ and /Photo/ are two different directories.
Check out how these blocks look in the file. In the example below, you can see how to restrict access to your photo directory with all of its subdirectories.
User-agent: googlebot
 Disallow: /Photo
This example shows how to prevent all search engines from crawling your entire site.
User-agent: *
 Disallow: /
Here’s how you can enable all search engines to crawl your entire site.
User-agent: *
 Disallow:
To validate your robots.txt file, use a testing tool in Google Search Console. You can find it under the Crawl menu.
Blocking access to some parts of your site has a practical benefit. There’s a limit on how many pages spiders can crawl on every site, i.e. the so-called “crawl budget.” By hiding sensitive pages, you extend that limit for the rest.
Step 6. Submit a sitemap to Google Search Console.
A sitemap is an important instrument of interaction with Google. While the robots.txt file tells the engine which parts of your site to skip in crawling, the sitemap indicates the pages to index.
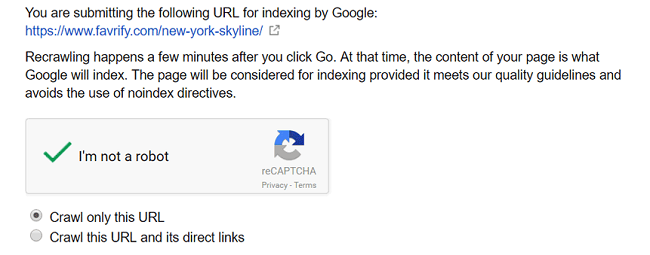
When you update your content, your sitemap will notify Google about it immediately. Thus, the engine will crawl your updated pages much faster than it would if it had to learn about the update itself. The screenshot below shows how to submit a page for recrawling.
Step 7. Speed up your site with CDN.
When a person from Australia visits a site hosted on a server in the US, the data has to travel a long distance. It results in slower page loading, which is one of 200+ signals Google uses in its ranking algorithm. Moreover, 40% of users leave pages that take over 3 seconds to load. That’s a huge traffic loss you can’t afford.
To minimize load times, use a CDN (content delivery network). It will cache your content on many servers around the world. That way, your data will load from the closest server to the user’s location. Not only will this speed up your website, but also let you save on bandwidth costs.
One of the best CDNs for WordPress sites is MaxCDN. Learn what advantages it offers to users here.
Besides CDNs, there are some other ways to make your site faster. They include Gzip compression, HTML and CSS minification, browser caching, image compression, removal of unnecessary plugins and other stuff, etc.
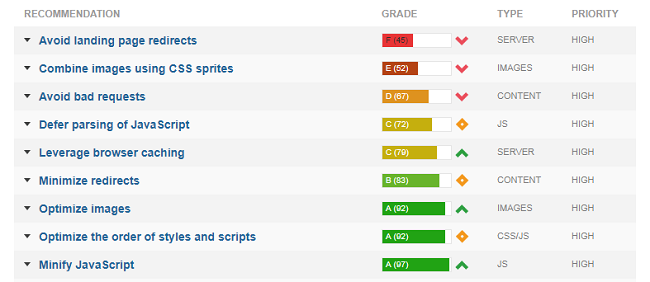
To test your website speed, use GTmetrix. After a quick yet in-depth analysis, this free tool will give you guidelines on how to optimize your page loading.
Step 8. Move your site from HTTP to HTTPS for an extra level of security.

HTTPS is a secure version of HTTP that encrypts communication between websites and browsers with an SSL certificate. Thanks to such encryption, no one can get unauthorized access to users’ confidential information like credit card details and browsing history.
SSL encryption is a must for online stores, as they keep customers’ private data. However, since HTTPS sites get a small ranking boost from Google, it makes sense to encrypt blogs, online magazines, and other informational resources too. To install an SSL certificate for free, use Let’s Encrypt.
Step 9. Find all broken links on your site and fix them.
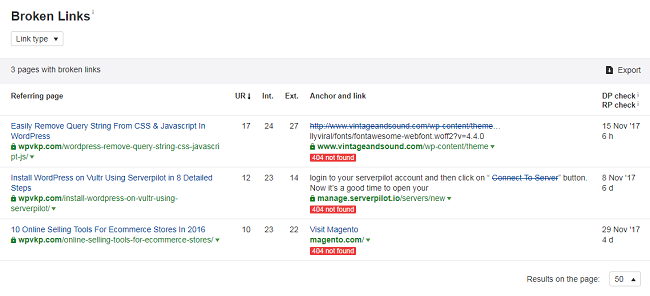
Broken links are obstacles to both your website indexation and user experience. And it’s your duty to take care of both.
If your site is new and has only a few pages, you can find broken links manually. But if you’ve run it for years, checking hundreds of posts will consume too much time. Instead, try this user-friendly checker of broken links to find them all in a few clicks. Here’s how you can use it:
- check the broken link nature (internal or external);
- detect the problem (404 not found or cannot resolve host);
- filter all broken links by their type (dofollow or nofollow)
Using this tool, you can also find backlinks on third-party resources that refer to your 404 pages. It will help you address shortcomings in your link building strategy. Focus on sites with a high domain rating first, as you’ll get more link juice from them.
Step 10. Ask Google what to fix on your WordPress site.
Who knows what needs to be fixed on your site better than Google? Go to the Crawl Error report in Google Search Console to monitor your site for errors. There are two main sections in the report.
- Site Errors. This section shows issues that blocked access to your entire site for Googlebot (DNS, server, and robots.txt file errors).
- URL Errors. This section reveals issues that Googlebot stumbled upon when crawling specific pages (common URL, mobile-only URL, and news-only errors).
As an example, server errors may signal your website downtime, while 404 pages tell where 301 redirects are missing.
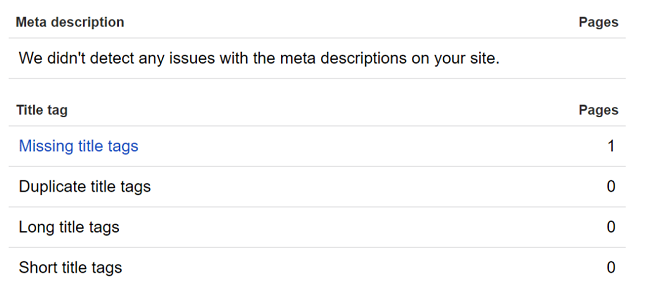
To get more advice on your SEO, go to the HTML Improvements report. It will help you solve issues with meta descriptions, title tags, and non-indexable content.
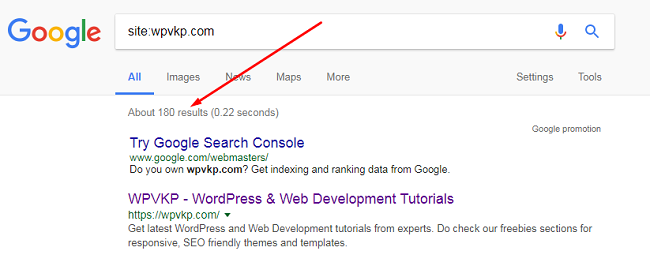
You can also use Google Search to detect indexing problems. Type site:domain.com into the search bar and see how many pages the engine can index on your site. If the number exceeds or falls short of your expectations, it’s a warning signal that something went wrong with indexation.
Conclusion
Here we are. As you can see, you can handle any technical SEO issues without super tech skills. Follow these steps to find out how your site is doing from Google’s standpoint. If you know some other ways to ease the tech job for dummies, feel free to share them in the section of comments.

Leave a Reply